Magento MCP setup guide
Connect your Magento store to AI
Set up Magebit's open-source Magento MCP module, then let Claude, ChatGPT, Cursor or any MCP client read and manage your orders, products, customers and content. Only the first step needs a developer.

What should the AI be able to do?
Tick what applies and we'll build the install commands. This is the only part that needs your Magento developer or hosting admin. The rest you can do yourself.
Raw database access needs care
This lets the AI read any table you allow, including customer names, e-mails and phone numbers. It ships switched off with no tables allowed. Read the module's guide before turning it on. Not sure? Untick it: the other options cover the same questions more safely.
Run these commands
Run them from your Magento installation folder. If someone else manages the server, copy the commands and send them over.
composer require magebitcom/magento2-mcp-suite

bin/magento module:enable Magebit_Mcp \
  Magebit_McpOrderTools \
  Magebit_McpCatalogTools \
  Magebit_McpInventoryTools \
  Magebit_McpCustomerTools \
  Magebit_McpCmsTools \
  Magebit_McpMarketingTools \
  Magebit_McpTaxTools \
  Magebit_McpReportTools

bin/magento setup:upgradeOne package instead of nine
You kept the standard set, so this installs magento2-mcp-suite: the MCP module and all eight tool modules in one go.
Untick a module and the commands switch to separate installs. You can also turn modules off later in app/etc/config.php.
Next, you'll need your store address
It's the URL you open to log in to your Magento admin, for example https://shop.example.com.
Which AI do you use?
Choose the one you use, then follow its steps. Wherever you see <your-store>, replace it with your real store address (e.g. shop.example.com).
 Claude (web)claude.ai in your browser.
 Claude CodeAnthropic's command-line tool.
 CursorAI code editor for developers.
 ChatGPTOpenAI's chat app, paid plans.
- Another MCP clientAny other MCP-compatible client.
Testing on staging?
Behind an IP allowlist or basic auth? Whitelist these paths so the AI can reach the module.
/mcp/.well-known/oauth-*Connect Claude (web)
Local development stores aren't supported here. claude.ai runs on Anthropic's servers, so it can't reach addresses like mystore.docker or mystore.local. If your store isn't publicly reachable over HTTPS, use Claude Code or Cursor instead. They run on your machine and can talk to local hostnames.
Two parts: first you'll register Claude as an OAuth client in your Magento admin and copy two values, then you'll paste them into Claude's connector setup. After that, signing in works through your normal Magento login.
What you'll do
- 1Register Claude in your Magento admin4 steps
- 2Add the connector in Claude6 steps
Part 1/2
Register Claude in your Magento admin
Open OAuth Clients
Sign in to your Magento admin. In the top menu, go to System → MCP → OAuth Clients. Click Add New Client.
Pick "Claude Web" from the Preset dropdown
On the new client form, open the Preset dropdown and select Claude Web. This autofills the Name and Redirect URIs with the right values, so you can leave them as they are.
Choose which tools Claude can use
Click the Allowed Tools tab. Nothing is ticked by default. Either click Allow All to grant Claude access to every tool, or tick the categories and individual tools you want. You'll also get a second chance to narrow this when you click Connect later.
Save and copy the Client ID and Secret
Click Save Client (top right). You'll be taken to a confirmation page that shows the Client ID and Client Secret. Copy both: the secret is only shown once.
Lost the secret? There's no in-place regenerate. Delete the OAuth client and create a new one. The old credentials stop working immediately.


Part 2/2
Add the connector in Claude
Open Claude's connectors page
Go to claude.ai/customize/connectors and sign in if you haven't already. The same page is reachable from the Claude menu: Customize → Connectors.
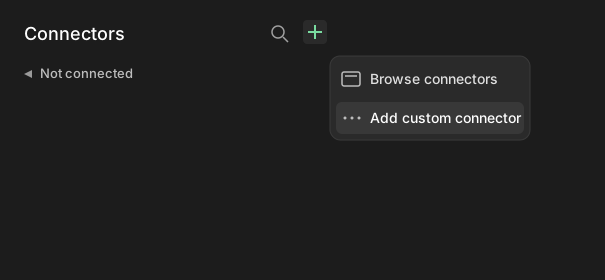
Click the + icon, then "Add custom connector"
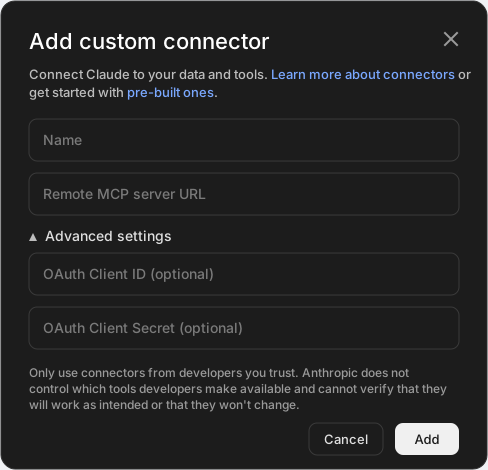
Fill in the connector details
Name: anything you'll recognise (e.g.
My Store).Remote MCP server URL:
https://<your-store>/mcpExpand Advanced settings and paste the two values you copied from Magento:
- OAuth Client ID: paste from part 1.
- OAuth Client Secret: paste from part 1.
Click Add.
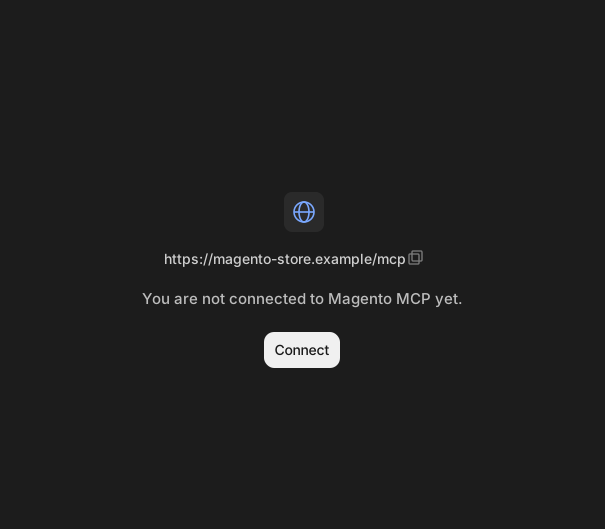
Click Connect
You'll land on a page that says You are not connected to Magento MCP yet. Click Connect.
Approve access in your Magento store
You'll be sent to your Magento store. If you're not already signed in to the admin, sign in. The Authorize MCP access page shows the categories of tools Claude is asking for. Untick anything you don't want Claude to have, then click Approve selected.
You're done
You'll be sent back to Claude and the connector appears in your list. Start a new chat and try the example below.
Connect Claude Code
Claude Code runs on your machine, so it can talk to your store directly, including local development stores (mystore.docker, mystore.local). The simplest setup is a connection token.
Two parts: first you mint a token in your Magento admin, then you point Claude Code at your store with that token.
What you'll do
- 1Create a connection token3 steps
- 2Add the connection in Claude Code2 steps
Prefer the command line for token creation?
If you have terminal access to your Magento server, you can mint the token there instead of using the admin panel:
bin/magento magebit:mcp:token:create \
  --admin-user <username> \
--name "Claude Code, laptop"Read-only by default. To let the AI make changes too, add --allow-writes to the end of the command.
Want to use OAuth instead of a token?
Claude Code does support OAuth 2.1 + PKCE, but this server doesn't support automatic OAuth client registration. You'll need to pre-register Claude Code as an OAuth client in your Magento admin (System → MCP → OAuth Clients) using the Custom preset, set Redirect URIs to http://localhost:<port>/callback (Claude Code defaults to 33418; whichever port you pick must match the --callback-port flag below), and then pass the credentials when adding the server:
claude mcp add --transport http magento \
  https://<your-store>/mcp \
  --client-id <client-id> \
  --client-secret <client-secret> \
--callback-port 33418The token approach above is simpler and more reliable for a CLI tool. Only reach for OAuth if you have a specific reason to.
Part 1/2
Create a connection token
Open MCP Connections in your Magento admin
Sign in to your Magento admin. In the top menu, go to System → MCP → Connections. Click New Connection.
Fill in the Token Info tab
Pick your Admin User, give the token a Name (e.g.
Claude Code, laptop), and set Allow Write Tools to Yes if you want Claude Code to make changes. Save.Copy the token
The next screen shows the token once. Copy it now.
Part 2/2
Add the connection in Claude Code
Register the server with the token
In any terminal, run:
claude mcp add --transport http magento \ https://<your-store>/mcp \ --header "Authorization: Bearer <your-token>"By default this stores the server in local scope (current folder, just you). Add
--scope userif you want the server available in every folder on your machine, or--scope projectif you want it committed to.mcp.jsonand shared with everyone on the project.Check it's connected
claude mcp listYou should see
magentowith a connected status. Inside a Claude Code session you can also run/mcpto inspect server details and tool counts.
Connect Cursor
Cursor doesn't have a browser sign-in flow, so you'll create a small connection token in your Magento admin and paste it into Cursor's settings.
What you'll do
- 1Create a connection token4 steps
- 2Tell Cursor about your store3 steps
Prefer the command line?
If you have terminal access to your Magento server, you can create the token there instead:
bin/magento magebit:mcp:token:create \
  --admin-user <username> \
--name "Cursor on my laptop"Read-only by default. To let the AI make changes too, add --allow-writes to the end of the command.
Prefer OAuth over a bearer token?
Cursor also supports OAuth for MCP servers. Register an OAuth client in your Magento admin (System → MCP → OAuth Clients, Custom preset, Redirect URIs set to whatever your Cursor build expects: check Cursor's docs or its first-connect error message for the exact URL), then point Cursor's mcp.json at the URL alone (no headers block). Cursor triggers OAuth automatically when it can't find auth credentials.
Part 1/2
Create a connection token
Open MCP Connections in your Magento admin
Sign in to your Magento admin. In the top menu, go to System → MCP → Connections. Click New Connection.
Fill in the Token Info tab
On the new connection form, the Token Info tab is open by default. Fill it in:
- Admin User: pick your own admin account (the token inherits its permissions).
- Name: something you'll recognise (e.g.
Cursor on my laptop). - Expires At (UTC): leave blank for a token that doesn't expire, or pick a date.
- Allow Write Tools: set to Yes if you want Cursor to make changes (create products, edit pages and so on).
(Optional) Narrow the Resource Access
Click the Resource Access tab. Leave it on All for full access, or switch to Custom to tick only the specific tools you want Cursor to use.
Save and copy the token
Click Save (top right). The next screen shows the token once. Copy it now, it can't be shown again.
Lost it? No problem. Delete that connection and create a new one. The old token stops working immediately.
Part 2/2
Tell Cursor about your store
Open Cursor's MCP settings
In Cursor, open Settings → Tools & MCPs. Click + New MCP Server. Cursor opens
~/.cursor/mcp.jsonin an editor tab (or creates it if it doesn't exist yet). For a per-project connection instead, create.cursor/mcp.jsonin the project root.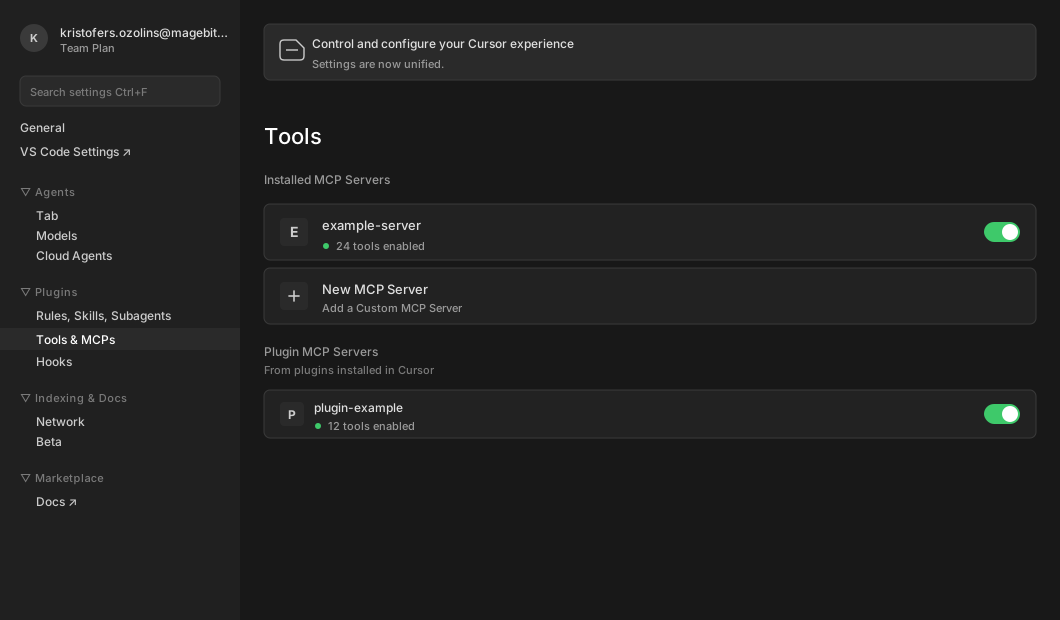
Paste this in, replacing the angle brackets
{ "mcpServers": { "magento": { "name": "magento", "url": "https://<your-store>/mcp", "headers": { "Authorization": "Bearer <your-token>" } } } }Save the file. Cursor picks up the change immediately, no reload needed.
Check the server's connected
Back on Settings → Tools & MCPs, your
magentoserver appears under Installed MCP Servers with a green status dot and a tool count. Toggle it on if it isn't already.
Connect ChatGPT
You need a paid plan with Developer mode. Custom MCP apps are only available on ChatGPT Plus, Pro, Business, Enterprise and Edu, not the Free tier. You'll also need to switch on Developer mode in Settings before you can create one.
ChatGPT generates a unique Callback URL for each app, so the order matters: you'll start in ChatGPT to grab that URL, then create the matching OAuth client in your Magento admin, then come back to ChatGPT to finish. OAuth is the only auth ChatGPT accepts for custom apps, no API keys.
Public store only. ChatGPT's OAuth flow runs through OpenAI's servers, so it can't reach private addresses like mystore.docker or mystore.local. If your store isn't publicly reachable over HTTPS, use Claude Code or Cursor instead. They run on your machine.
What you'll do
- 1Enable Developer mode in ChatGPT2 steps
- 2Grab ChatGPT's Callback URL3 steps
- 3Register the OAuth client in your Magento admin4 steps
- 4Finish creating the app in ChatGPT4 steps
Part 1/4
Enable Developer mode in ChatGPT
Open Settings → Apps
Go to chatgpt.com and sign in. Open Settings → Apps. On a workspace plan (Business, Enterprise or Edu), an admin may need to enable Developer mode for the workspace first.
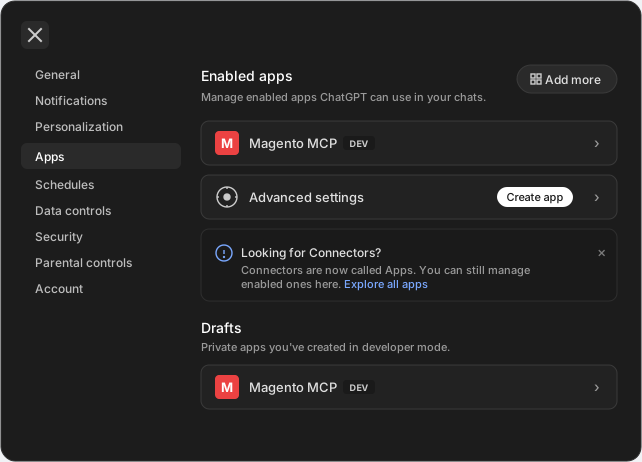
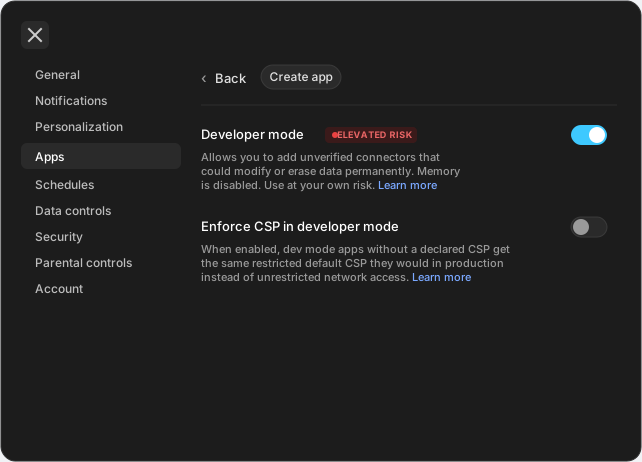
Click Advanced settings, then toggle Developer mode on
Under Advanced settings, switch on Developer mode. It's marked Elevated risk because dev-mode apps aren't reviewed by OpenAI, which is expected. A Create app button appears at the top of the Advanced settings panel once it's on.
Part 2/4
Grab ChatGPT's Callback URL
Click Create app
From the Apps page, click Create app. The New App dialog opens.
Fill in the basics
In the dialog:
- Name: anything you'll recognise (e.g.
Magento MCP). - MCP Server URL:
https://<your-store>/mcp - Authentication: OAuth.
- Name: anything you'll recognise (e.g.
Open Advanced OAuth settings and copy the Callback URL
Expand Advanced OAuth settings. Under Client registration, the Registration method defaults to User-Defined OAuth Client. Leave it there (DCR and CIMD show as unavailable, which is expected). ChatGPT displays a Callback URL like
https://chatgpt.com/connector/oauth/<random-id>. The random ID is unique to this app. Click Click to copy to grab it. Keep this dialog open, you'll need it in part 4.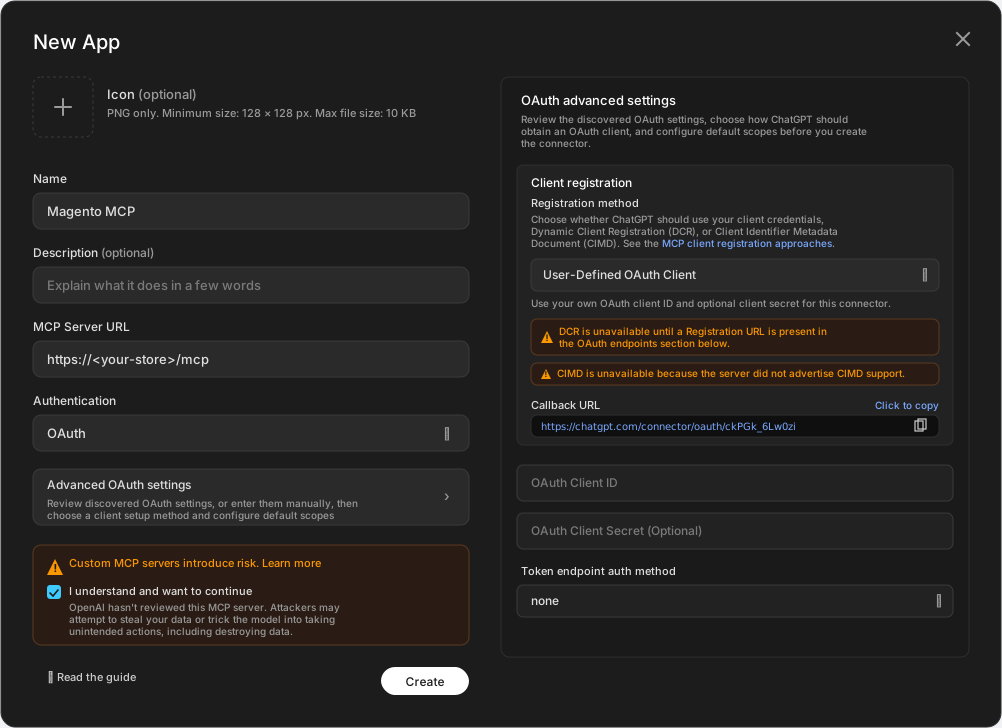
Part 3/4
Register the OAuth client in your Magento admin
Open OAuth Clients
In a new tab, sign in to your Magento admin. In the top menu, go to System → MCP → OAuth Clients. Click Add New Client.
Fill in the form with the Custom preset
On the new client form, open the Preset dropdown and select Custom. ChatGPT generates a different Callback URL for every app, so a static preset wouldn't help anyway. You'll paste the per-app URL by hand.
- Name: e.g.
ChatGPT. - Redirect URIs: paste the Callback URL you copied from ChatGPT in part 2 (e.g.
https://chatgpt.com/connector/oauth/<random-id>).
- Name: e.g.
Choose which tools ChatGPT can use
Click the Allowed Tools tab. Nothing is ticked by default. Click Allow All for full access, or tick the categories and tools you want.
Save and copy the Client ID and Secret
Click Save Client. You'll see the Client ID and Client Secret. Copy both: the secret is only shown once.
Part 4/4
Finish creating the app in ChatGPT
Paste the Client ID (and the Secret, if you want it)
Back in the ChatGPT New App dialog, paste your Magento OAuth Client ID. The OAuth Client Secret field is optional: leave it blank to use PKCE without a secret, or paste the Magento secret in for client-secret auth.
Acknowledge the risk and click Create
Tick I understand and want to continue on the risk notice, then click Create.
Connect and approve access in Magento
ChatGPT opens your Magento login page. Sign in if needed. On the Authorize MCP access page, untick anything you don't want ChatGPT to have, then click Approve selected.
Switch it on in your chat
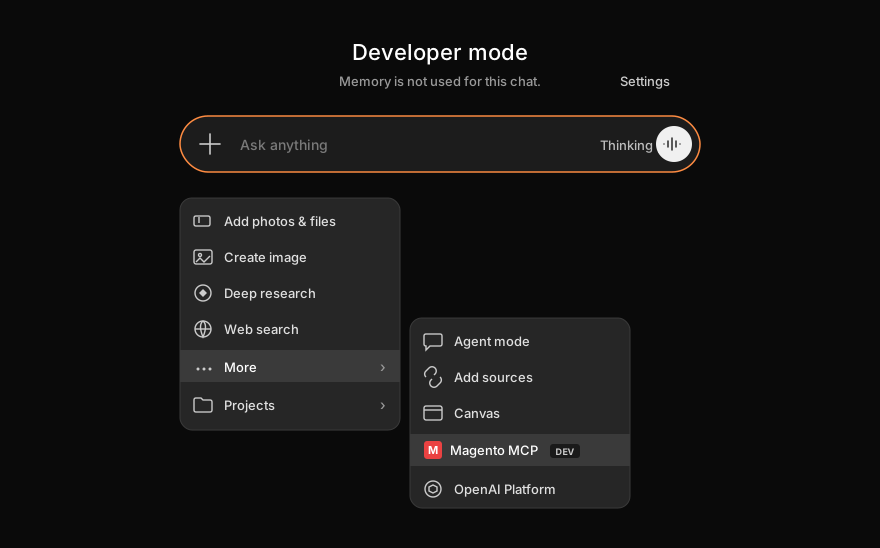
Open a new chat. Click the + in the message composer, hover More, and pick your app from the submenu. Without this step, ChatGPT won't use your store's tools. Once enabled, your app appears as a chip next to the + button. That's how you know it's active for the current chat.
Connect another MCP client
Any MCP-compatible client can connect to your store. You'll need two things: your store's MCP address and a way for the client to prove who it is. Pick whichever method your client supports:
Your store's MCP server URL
https://<your-store>/mcp
Pick how it signs in
OAuth metadata endpoints (for clients that auto-discover)
Some clients can discover OAuth endpoints automatically from RFC 8414 and RFC 9728. The metadata lives at:
https://<your-store>/.well-known/oauth-authorization-server
https://<your-store>/.well-known/oauth-protected-resourceYou'll still need to pre-register the client in Magento admin to get a Client ID and Secret. This server doesn't support Dynamic Client Registration.
Prefer the command line for token creation?
If you have terminal access to your Magento server, you can mint a token there instead:
bin/magento magebit:mcp:token:create \
  --admin-user <username> \
--name "<label>"Read-only by default. To let the AI make changes too, add --allow-writes to the end of the command.
Option A
OAuth 2.1
Register the client in Magento admin
Use this if your client lets you paste an OAuth Client ID and Secret (or supports automatic OAuth discovery). Sign in to your Magento admin. Go to System → MCP → OAuth Clients and click Add New Client.
Fill in Name and Redirect URI
Open the Preset dropdown. If your client is in the list, pick it and skip ahead. If it isn't, fill the fields manually:
- Name: anything you'll recognise (e.g. the client name).
- Redirect URIs: the OAuth callback URL from your client's documentation. Must match exactly, with no trailing slash.
Choose which tools the client can use
Click the Allowed Tools tab. Nothing is ticked by default. Click Allow All for full access, or tick the categories and tools you want.
Save and copy the Client ID and Secret
Click Save Client. You'll see a Client ID and a Client Secret. Copy both: the secret is only shown once.
Configure your client
In your MCP client, add a new server with the URL above and paste the Client ID and Secret into the OAuth fields. When you connect, your Magento admin login page opens. Sign in and click Approve selected.
Option B
Bearer token
Create a token in Magento admin
Use this if your client lets you paste an API key or an Authorization header. Simplest path: no consent screen, no client registration.
Sign in to your Magento admin. Go to System → MCP → Connections and click New Connection. On the Token Info tab, pick your Admin User, give the token a Name, and set Allow Write Tools to Yes if the client should be able to make changes. Then click Save.
Copy the token
The next screen shows the token once. Copy it. If you lose it, delete that connection and create a new one.
Configure your client
Point your client at the URL above. Send the token as an Authorization header:
Authorization: Bearer <your-token>Most MCP clients have either a header field in their server config, or a way to call the server through the mcp-remote stdio bridge. That bridge takes a
--headerflag:Or use the mcp-remote bridge
npx -y mcp-remote https://<your-store>/mcp \
  --header "Authorization: Bearer <your-token>"
You're connected
Open a new chat and paste one of these.
Start a Claude Code session and paste one of these.
Open Cursor's chat (Cmd+L on Mac, Ctrl+L on Windows), switch to Agent mode and paste one of these.
In the chat where you turned the app on, paste one of these.
Paste one of these into your MCP client.
Show me a graph of orders per day for the last month.
Which products are out of stock right now?
Who were my top 5 customers by revenue this year?
How many orders did we get each day last month?
Which products are out of stock right now?
Who were my top 5 customers by revenue this year?
How many orders did we get each day last month?
Which products are out of stock right now?
Who were my top 5 customers by revenue this year?
Show me a graph of orders per day for the last month.
Which products are out of stock right now?
Who were my top 5 customers by revenue this year?
Show me a graph of orders per day for the last month.
Which products are out of stock right now?
Who were my top 5 customers by revenue this year?
Something not working?
Not connecting? Run the connection checker to test reachability and redirects from your browser, or verify the full sign-in with the MCP Inspector guide.
"Couldn't connect" right after clicking Add
Your store needs to be reachable from the internet over HTTPS. Claude can't see a local .local or .docker address.
"Invalid client" on the Magento authorize page
The Client ID or Secret was pasted with extra whitespace or doesn't match the one stored in Magento. Open the OAuth client in Magento admin, copy the values again, edit the connector in Claude and re-paste them.
"You don't have permission to do that" after approving
The admin user who signed in is restricted. Sign in to Magento admin as a different user when you click Connect again, or ask your developer to widen that user's role.
Something not working?
Not connecting? Run the connection checker to test reachability and redirects from your browser, or verify the full sign-in with the MCP Inspector guide.
"401 Unauthorized"
The token is wrong, revoked, or the Authorization header is malformed. Run claude mcp remove magento, then add it again with a fresh token.
"failed to connect" right after claude mcp add
The store address has to be HTTPS. For local development stores, make sure your shell can reach the URL. Try curl -I https://<your-store>/mcp first.
No tools show up in chat
Run claude mcp list and confirm the connection is green. If it's red, remove it and add it again.
Something not working?
Not connecting? Run the connection checker to test reachability and redirects from your browser, or verify the full sign-in with the MCP Inspector guide.
Server stuck on "starting"
There's a typo in mcp.json. Even one missing quote or extra comma will break it. Paste it into a JSON validator like jsonlint.com to check.
Cursor ignores your store's tools
Cursor only uses MCP servers in Agent mode, not in Ask mode. Switch at the bottom of the chat panel.
"Unauthorized"
The token is wrong, or you mistyped it when pasting. Create a fresh one and try again.
Something not working?
Not connecting? Run the connection checker to test reachability and redirects from your browser, or verify the full sign-in with the MCP Inspector guide.
I can't find Developer mode
It's in Settings → Apps → Advanced settings → Developer mode, and it requires a Plus, Pro, Business, Enterprise or Edu plan. On Business, Enterprise or Edu, your workspace admin has to enable it first.
"Couldn't save the connector"
Your store has to be reachable from the internet over HTTPS. ChatGPT can't see a local or staging-only address.
"Invalid redirect URI" on the Magento authorize page
The Redirect URI you saved in Magento doesn't match ChatGPT's Callback URL. Open the OAuth client in Magento admin and re-paste the exact https://chatgpt.com/connector/oauth/<random-id> string from ChatGPT's Advanced OAuth settings. It must match character for character, with no trailing slash.
Your store isn't in the Tools list
You probably skipped the last step. Click the + in the chat composer and pick your app under More.
"You don't have permission"
The admin user who signed in is restricted. Sign in as a different admin user, or ask your developer to widen that user's role.
Something not working?
Not connecting? Run the connection checker to test reachability and redirects from your browser, or verify the full sign-in with the MCP Inspector guide.
401 Unauthorized
For bearer: the token is wrong, revoked, or the Authorization header is malformed. For OAuth: the Client ID or Secret is wrong, or the Redirect URI doesn't match what the client is using.
503 Service Unavailable
The MCP server is turned off. Ask your developer to check Stores → Configuration → Magebit → MCP Server and confirm Enable MCP Server is set to Yes.
"Origin rejected"
Your client's origin isn't in the allowlist. Add it under Stores → Configuration → Magebit → MCP Server → Allowed Origins.
Unsupported protocol version
The server speaks MCP 2025-06-18. Older clients may need to send Mcp-Protocol-Version: 2025-06-18 explicitly, or update to a newer client build.